Translate

Tuesday, May 2, 2023

Paint It


With Lawn Fawn Art Supplies die set of paint tubes, brushes, a palette and paint splatters combined with Lawn Fawn Canvas and Easel stamp and die set of a canvas, easel and a cute artist's stool to create an artistic masterpiece to your next crafty projects! 

Also, one Father's Day card was made with the Lawn Fawn Platform die set with these adorable Lawn Fawn You Goat This stamp set. Both cards have the Father's Day sentiment from the Lawn Fawn Spring Message 
stamp set as well as the Lawn Fawn All the Dots paper pads  of gorgeous spring colors.

I am entering this card in Simon Says:  Paint It.  

Saturday, March 4, 2023

Sizzix Mini Rose 3D embossing Happy Birthday

Welcome back and Nancy, here.  Today, I wanted to share additional tips, tricks and techniques with you for adding some boldly unique dimension to the Sizzix Tim Holtz 3D Texture Fades Embossing Folder Mini Rose using my Sizzix Big Shot machine.  For those following my Saturday blogs for The Rubber Buggy, last week I had a number of ways of coloring this gorgeous rose embossing folder which leaves a 3D impression and really pops out especially after coloring the roses and leaves.
 
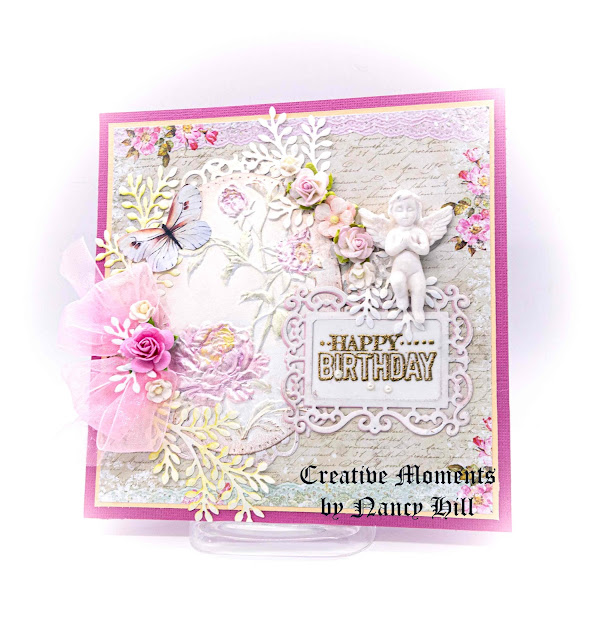
I cut an oval shape using Spellbinder Oval Nestabilities oval frame before putting the Sizzix 3D Mini Rose through the Sizzix Big Shot and don't forget to spray a little water on the cardstock before putting it in the Big Shot to bring out the 3D embossing.  After cutting out the gorgeous mini rose, I tab a little water and Perfect Pearls on a mat and colored the roses and leaves with a paint brust and let dry. I did the same for adding darker pink using the Distress Pink Watercolor crayon.  I used my finger to smear Redesign Brass Wax around the oval frame and if I got a little too much, I used a pencil eraser to erase some of the brass wax off.   

I cut out two Graphic 45 Decorative Die frames of pink and white cardstock and glue the white frame slightly on top of the pink with a little pink showing to give it a soft shadow tough and bring out the white frame.  I stamped Happy Birthday on the center of the decorative frame with embossing ink and used a gold embossing powder with an embossing heat gun to adhere the embossing powder.

I made my cherub with Art Resin and a mould from my stash and painted it with Prima Marketing White Pearl Metallic acrylic paint which is my all time favorite white paint with the gorgeous shine.  

The white leaves die cut were slightly painted with Distress Watercolor green crayon.  There are new Spellbinder floral die cuts that are now available  at The Rubber Buggy.    

The mini rose embossing measures around 2 1/2" x 4" after cutting down to size for framing.

Helpful tips to get started with any Sizzix 3D embossing folder:

  1. Only need 1 Cutting Pad is used when embossing with our 3D Embossing Folders because these folders are so thick.
  2. Misting your material, especially if it is a heavy weight cardstock, with water on one sides prior to placing the material inside of your embossing folder to achieve MAXIMUM impression!  Also, misting helps from the paper cracking with the deep impressions.
  3. Run your embossing folder through your machine a total of 3 times for a rich, bold and deep textures. Long ago, I ruined an embossing folder by running it through the bottom open part rather than the top of the embossing folder and it tore the embossing folder apart. 
  4. For several occasions, I did the embossing and while coloring afterwards, I layed my mini rose back against the bumpy part  of the inside and then folded the embossing folder down and went through my Big Shot just one time to get the full impression back and make it pop again.  
Supplies:
Sizzix Tim Holtz 3D Texture Fades Embossing Folder Mini Rose

cannot wait for you all to get your hands on any Sizzix Tim Holtz 3D embossing folders and see what you create! I hope I’ve shared some tips, tricks and ideas that you’ll be able to use in your own crafty adventures.  

The Rubber Buggy has the crafting supplies for your next project. So have fun crafting this weekend with these products.   My cards and projects are always posted on Saturday.  Keep watching and thank you so much for those wonderful comments as well as suggestions. 


Saturday, February 25, 2023

Sizzix Tim Holtz Mini Rose Technique cards

Welcome back and Nancy, here.  Today, I wanted to share some tips, tricks and techniques with you for adding some boldly unique dimension to the Sizzix Tim Holtz 3D embossing folder.  With a bit of cabin fever, I  experienced "Obsessive Creativity" using the Sizzix Tim Holtz 3D Texture Fades Embossing Folder Mini Rose with my Sizzix Big Shot machine for the past week.  

The mini rose embossing measures around 2 1/2" x 4" after cutting down to size for framing.

Helpful tips to get started with any Sizzix 3D embossing folder:

  1. Only need 1 Cutting Pad is used when embossing with our 3D Embossing Folders because these folders are so thick.
  2. Misting your material, especially if it is a heavy weight cardstock, with water on one sides prior to placing the material inside of your embossing folder to achieve MAXIMUM impression!  Also, misting helps from the paper cracking with the deep impressions.
  3. Run your embossing folder through your machine a total of 3 times for a rich, bold and deep textures. Long ago, I ruined an embossing folder by running it through the bottom open part rather than the top of the embossing folder and it tore the embossing folder apart. 
  4. For several occasions, I did the embossing and while coloring afterwards, I layed my mini rose back against the bumpy part  of the inside and then folded the embossing folder down and went through my Big Shot just one time to get the full impression back and make it pop again.  
I will share cards made with this gorgeous Sizzix 3D Mini Rose embossing folder.  I used a copper Tim Holtz metallic cardstock on the embossing.  The cardstock is the Ciao Bella Cozy Moments stamped with an ole stamp  I used my sewing machine to sew around the front layer before gluing to the frame for a shabby chic appearance.  I found an old frame for behind the embossed copper rose and a stamp for a nice sentiment.

The picture doesn't do this card justice since it was difficult to show off the Tim Holtz silver cardstock and white/gold shimmer cardstock with the lighting.  I just love how this embossing came out.  After embossing, I used a sprint of water and Distress pink crayon and brushed on to the roses and did the same with the Distress water color green crayon for the leaves.  I used the Sizzix Tim Holtz 3D Entangled Embossing folder for the background.
I just loved how deep the impression came out on metallic cardstock.
Embossing on patterned cardstock was an experiment.  I embossed first and then painted on Tim Holtz Distress water color crayons.  Some of the patterns on the cardstock showed through the roses but I liked how it fades into the cardstock.  Rerunning the paper back through the embossing folder popped the embossing back up.
I love using shimmer cardstock and how the embossing shows up so well.  I tapped on  Ranger Distress ink pads on the flat inside of the embossing folder before running it through the Big Shot.  The embossing shows a pure white mini roses and leaves.  For the next two embossed roses, I scribble a bit of Distress water color crayon on my craft mat, spritz it with water and with a paintbrush paint it the roses and leaves.   It's a pretty cool look, very pigmented. I even liked the one on the left with just a pure white embossing on white shimmer cardstock.  
This was a big experiment of using a stamp tool and stamping the music notes on the inside of the flat part of the embossing folder and then run the paper through the Big Shot to have this background.  The purple one was done first with purple ink padded on the inside of the embossing folder and then run through the Big Shot.  When the ink dried, stamped the music notes on the same flat part of the inside of the embossing folder and run it through the Big Shot again to get this background.  Found it easier to lay the paper back into the embossing folder on the bumpy backside and then fold the front of the embossing folder forward to run through the Big Shot.  Make sure the paper didn't move inside the embossing folder so taping it down helped.

I ran the embossing folder with black cardstock first through the Big Shot and then used Prima Marketing Brass metallic wax smearing with my fingers on black cardstock.  Rerunning the folder with the paper pops the embossing back up but won't recommend doing this after using metallic wax since it smeared too much and hard to clean off the inside of the embossing folder.

TIP:  I used my fingers for smearing on the metallix wax to the rose and leaves on black cardstock.  Afterwards, I took just a pencil eraser and erased parts of the metallix wax that I didn't want around the roses and leaves on the black cardstock.

Supplies:
Sizzix Tim Holtz 3D Texture Fades Embossing Folder Mini Rose
Sizzix Tim Holtz 3D Entangled Embossing Folder 

cannot wait for you all to get your hands on any Sizzix Tim Holtz 3D embossing folders and see what you create! I hope I’ve shared some tips, tricks and ideas that you’ll be able to use in your own crafty adventures.  

The Rubber Buggy has the crafting supplies for your next project. So have fun crafting this weekend with these products.   My cards and projects are always posted on Saturday.  Keep watching and thank you so much for those wonderful comments as well as suggestions. 


Saturday, February 18, 2023

Sizzix Tim Holtz Thinlit Dies Gentlement card

Welcome back and Nancy, here, to share a steampuckcard made with new 2023 arrival of 


This card measures 5" x 6" and I will go over what I did and you can do the same or come up with your own fabulous ideas.

I love these two older Tim Holtz embossing folders and used silver metallic cardstock, sprayed lightly water on the back of the cardstock and ran through my Sizzix Big Shot about three times.  I cut out part of one embossing folder and glued to the other.  I used my fingers to smear Prima Marketing Redesign Brass wax along with Prima Marketing Charcoal Black wax around the embossing. I sponged on Distress Campfire and Black Soot ink by just using the ink pad flat with the embossing folder on parts of the embossing folder.

I sponged the gears and cogs with my new favorite Prima Marketing Redesign Brass wax along with another Prima Marketing Firebird wax and Charcoal Black.   I used Prima Marketing Redesign Brass wax with Prima Marketing Firebird wax on the Prima Marketing Rusty Pipeline mould casting.  I used an epoxy resin for my mould and let dry over night before coloring and adhering to my card.  I used the small pipes  in this mould for this card.  I added a few other metal embellishments from my stash and adhered these to the card with Beacon 3-in-1 Advanced Glue.
 
I brushed on ReDesign - Decor Wax 1.69 oz (50 ML) - Brass on the Sizzix Gentlement die cuts since I wanted to tone down the black die cut men and have other embellishments to be as noticeable on the card.

I cut out the 4-Leaf clovers with the Sizzix 3-D Lucky Love Impresslits with a brass  cardstock.  First cut out about a 4" square and spray lightly with water on the back of the cardstock and then run it through the Sizzix Big Shot about four times for the desired impression.  In the past, I have colored these impresslit die cut and placed the die cuts back into the impresslit embossing folder and ran through the Sizzix Big Shot again to bring out the 3-D embossing.   

I found a sentiment in the Tim Holtz sentiment label package and added some glue behind it and adhered it to the card.

Supplies:
I hope I’ve shared some tips, tricks and ideas that you’ll be able to use in your own crafty adventures.  The Rubber Buggy has the crafting supplies for your next project. So have fun crafting this weekend with these products.   My cards and projects are always posted on Saturday.  Keep watching and thank you so much for those wonderful comments as well as suggestions. 


Saturday, February 11, 2023

Ciao Bella Cozy Moments Shabby Chic birthday card


Welcome back and Nancy, here.  We’re going shabby chic today with Ciao Bella Cozy Moments paper with added distressed edges, pearls, soft pastel colors, ribbon, and spattered paint and my favorite rustic colored rose.  This birthday card features a winning round up of Ciao Bella Cozy Moments paper collection and Scrapiniec Old Fashioned Christmas chipboard  from The Rubber Buggy.   


I built the background of my card with the gorgeous cardstock in the Ciao Bella Cozy Moment paper pack.    Then I dug into my embellishments and went to work on building around the two layered Scrapiniec heart chipboard with pearls, soft bows and a handmade chelub from resin and a mould.  
Ciao Bella Cozy Moments paper collection 

Scrapiniec Old Fashioned Christmas chipboard 

There is a lot of shabby chic creativity to see here so cozy up, join me for the tutorial and see how simple to construct this shabby chic birthday card for your very special person.

Let's get started:  
  • First, slowly take the front and back heart chipboards from the package and use white acrylic paint for the front heart and pink for the back layer and after dried, glue together.
  • Align the heart chipboard to a die cut doily and stamp the sentiment with black ink to a doily.
  • While the glue is drying, cut out a 4" x 6" pattern paper and glue to a 5" x 7" wooden patterned paper from the Ciao Bella Cozy Moment cardstock.  Add 1/8" of black cardstock to each patterned paper and glue together.
  • Using Scor-tape, add a handmade bow with the ribbon across the cardstock lenghtwise. 
  • Using Ranger Distress Oxide Ground Espresso, sponge around the edges of the card.  
  • Glue the frame to the base of your card which measures 5" x 7". 
  • Glue the heart to the center of the card.  Easy peasy!
  • Next, add a white feather and a Wild Orchid Craft two tone rose with glue.
  • I added bronze finger nail polish to 5mm flat back pearls and glue to parts of the heart chipboard.
  • I added a handmade resin cherub painted with white acrylic paint to the card.
  • Add a little Stamperia Arctic Ice paste around the card for that shimmering snow.

 I hope I’ve shared some tips, tricks and ideas that you’ll be able to use in your own crafty adventures.  The Rubber Buggy has the crafting supplies for your next project. So have fun crafting this weekend with these products.   My cards and projects are always posted on Saturday.  Keep watching and thank you so much for those wonderful comments as well as suggestions. 


Saturday, February 4, 2023

Cozy Wintery Moments

Welcome back and Nancy, here. There is no secret that I love the snowy moments while walking my dog in the country side with the sparkling shine of the snow blanketing our farm fields and occasionally catching a glimps of our furry wild animals watching us.  It’s a cozy memory, despite the cold but I see fluffy snowflakes that look like flowers slowly floating around me and covering our trail.  I tried to capture the feeling of serenity and natural beauty of recreating these moments using the Ciao Bella Cozy Moments paper collection to create these cards.

Each card measured 5" x 7".  I created this gray frame around the deer using the Sizziz 3D Ring Tree embossing folder.  I brush the Ranger Ground Espresso ink pad inside the 3D embossing folder.  Cut out my frame using the Cozy Moment cardstock and sprayed lightly with water.  I ran parts of the frame through the embossing folder until the entire frame was embossed.  I like how this frame looked so natural with the picture.  I used the Cozy Moment cardstock for the outside frame as well.  I cut out the sentiment in the cardstock, added 3D foam adhesive tape with brads to the card.  I added an 1" burlap ribbon across the card for that natural woodsy look.  I added some Stamperia SnowflakeArtic Ice paste on the chipboard snowflakes and around the card.  I used the Stamperia stencil with Pentart Antique Paste White on part of the card and after dried, added more Artic Ice Paste to the stenciled snowflakes.  


I used the Stamperia Arctic Ice Paste after adding the chipboard to card for that snowy looks.  I just love this little bunny in the snow which reminds me of the Jack Rabbits around our country house.  

Supplies:

So cozy up your wintery gray days with a nice walk outside and enjoy the winter while it last while spending the rest of the day crafting and special times with friends and family as well as your cozy furry friends.

The Rubber Buggy has the crafting supplies for your next project. So have fun crafting this weekend with these products.   My cards and projects are always posted on Saturday.  Keep watching and thank you so much for those wonderful comments as well as suggestions. 


Saturday, January 28, 2023

Sizzix Tree Rings 3D Embossing Folder Valentine's Cards


Welcome back and Nancy, here.  If you love nature like our family and friends, then you'll love the Sizzix Tree Rings 3D Texture Fades Embossing Folder by Tim Holtz with this bold tree-inspired embossing folder. This embossing folder has incredible depth of detail, making it perfect for creating rustic looking cards throughout the year. I cannot wait for you all to get your hands on these new Sizzix Tim Holtz 3D embossing folders like this one and The Rubber Buggy has all of these arrivals from Sizzix/Tim Holtz for creating your stunning card and projects.


The embossed area was trimmed to 4" x 6" before adding the background layers.

I am loving the Sizzix Tim Holtz Lucky Love Impresslit die that embosses and cuts at the same time a heart and a 4-leaf clover.  I stamped a piece of Tim Holtz Kraft Gold Metallic cardstock in my stamp tool and applied embossing powder to keep the ink from smearing on the metallic paper and then centered it in the heart in the Sizzix Lucky Love Impresslit die through the Sizzix Big Shot.  I sponged on Ranger Ground Espresso and Gathered Twigs before embossing  with the Tree Ring embossing folder.  Just a reminder, I sponged the black ink inside the embossing folder, lightly sprayed the cardstock with a mist of water and ran the embossing folder 3 times in the Big Shot.  I love this technique since it brings out the wood grain so well.  I used a hot glue gun to adhere the Tim Holtz key to the card.  I found an ole sticker to add to the card.  
I just love the shimmer of this rustic red card.  For the center of the card using silver metallic cardstock, I used an ole Sizzix Tim Holtz embossing folder and sponged the inside of the embossing folder with black ink, layed a piece of Tim Holtz Kraft Silver Metallic cardstock and ran it through the Sizzix Big Shot about 3 times.  I used an heart die and cut the center of the tree ring and glued the embossed silver piece behind the embossed tree ring.  I found a Tim Holtz sentiment chipboard and used Beacon 3-n-1 glue to adhere it and used a hot glue gun to adhere the metal gears to the card.  Found an ole metal button and added it to the center of the gear.

 These are my samples I experimented  with different colors of Ranger inks and  cardstock paper as well as tried out using the back embossed piece of cardstock which was an interesting look.  I prefer using heavy weight cardstock.  My favorite was the copper brown shimmer cardstock as well as the cream cardstock that was sponged with Distress warm inks before embossing. The patterned cardstock that was embossed definitely was an interesting look.  When embossing, you only need 1 Cutting Pad since these folders are so thick. Mist your cutout cardstock, especially if it is a heavy weight cardstock, with water on both sides prior to placing the material inside of your embossing folder and running it through your machine three times to achieve full embossing.  

Supplies:

Tim Holtz Chipboard Set

That’s it for me today!  I’m still trying to get back on track after the New Year!  Now it is crafting our Valentine's cards and other occasions to keep up busy.

The Rubber Buggy has the crafting supplies for your next project. So have fun crafting this weekend with these products.   My cards and projects are always posted on Saturday.  Keep watching and thank you so much for those wonderful comments as well as suggestions.